For the past year, Descomplica moved towards a more service-oriented architecture for its core components (auth, search, etc) and we’ve been using Elastic Beanstalk from the start to orchestrate the deployment of those services to AWS.
It was a good decision at the time. In general, Elastic Beanstalk works fine and has a very gentle learning curve; it didn’t take long for all teams to start using it for their projects.
Fast-forward a few months, everything was nice and good. Our old problems were solved, but - as you might have guessed - we had new ones to worry about.
Cost Issues
In Elastic Beanstalk, each EC2 instance runs exactly one application container.1 This means that, if you follow reliability best practices, you’ll have two or more instances (spread across multiple availability zones) for each application. You might need even more instances if you have other environments besides the production one, i.e. staging.
Anyway, you’ll end up having multiple dedicated instances per service which, depending on your workload, will sit there doing nothing most of the time.
We needed to find a way to use our available compute resources more wisely.
The Winner
After looking around for alternatives to ECS, Kubernetes seemed to be the right one for us.
Kubernetes is a container orchestration tool that builds upon 15 years of experience of running production workloads at Google, combined with best-of-breed ideas and practices from the community.
Although Kubernetes is a feature-rich project, a few key features caught our attention: namespaces, automated rollouts and rollbacks, service discovery via DNS, automated container scaling based on resource usage, and of course, the promise of a self-healing system.
Kubernetes is somewhat opinionated around how containers are supposed to be organized and networked, but this should not be a problem if your service follows the Twelve-Factor practices.
Our Path to Production

In order to ensure Kubernetes was a viable option for us, the first thing we did was perform some reliability tests to make sure it could handle failure modes such as dying nodes, killed Kubelet/Proxy/Docker daemons, and availability zone outages.
It’s impossible to anticipate all the ways things can go wrong, but in the end, we were very impressed by how Kubernetes managed to handle these failures.
At that time, we used kube-up to bootstrap our test clusters. This tool, although it served its purpose, not always worked as expected; it suffered from a number of issues, such as poorly chosen defaults, random timeouts that left the stack only half-created, and inconsistent behavior when destroying the cluster causing orphan resources to be left behind.2
Once we agreed that Kubernetes was the way to go, we needed a more reliable way to create and destroy our Kubernetes clusters.
Enter kube-aws
kube-aws is a tool created by some good guys from CoreOS. The cool thing about it is that it uses CloudFormation under the hoods, which gives us some neat advantages.
The first obvious advantage is that it’s very easy to create and destroy clusters without leaving anything silently hanging around.
Another feature is that, unlike kube-up, you can create a cluster in an existing VPC so all services running in Kubernetes have access to your existing AWS resources - such as relational databases - right off the bat.
In fact, you can run multiple clusters at the same time in the same VPC. This has a nice side-effect in which you can treat each cluster as an immutable piece of infrastructure; instead of modifying a running cluster - and risking break something - you simply create a new cluster and gradually shift traffic from the old one to the new in a way that any incidents has limited impact.
The final and probably the most useful feature is that you can easily customize nearly every aspect of the cluster provisioning configuration to make it fit your own needs. In our case, we added cluster level logging that ingests application logs to Sumologic, cluster monitoring with InfluxDB and Grafana, ABAC-based authorization, among other things.
The First Environment
After solving the problem of reliably creating and destroying clusters, we felt confident to start migrating our staging environment over to Kubernetes.
It was easy enough to manually create the yaml manifests for the first deployments, but we needed an automated way to deploy new application images as soon as they were built by our continuous integration system.
Just as a proof of concept, we quickly hacked together a small function in AWS Lambda (based on this article) that automatically updated the corresponding deployment object whenever it received a merge notification in which the tests passed.
This small Lambda function has now evolved into a major component in our delivery pipeline, orchestrating deployments to other environments as well, including production.
With this done, migrating staging services from Beanstalk to Kubernetes was pretty straightforward. First, we created one DNS record for each service (each initially pointing to the legacy deployment in Elastic Beanstalk) and made sure that all services referenced each other via this DNS. Then, it was just a matter of changing those DNS records to point the corresponding Kubernetes-managed load balancers.
To ensure every part of the pipeline was working as expected, we spent some time monitoring all staging deployments looking for bugs and polishing things up as we could.
More Tests, More Learning
Before deploying our first production service to Kubernetes, we did some load testing to find out the optimal configuration for the resource requirements needed by each service and out how many pods we needed to handle the current traffic.
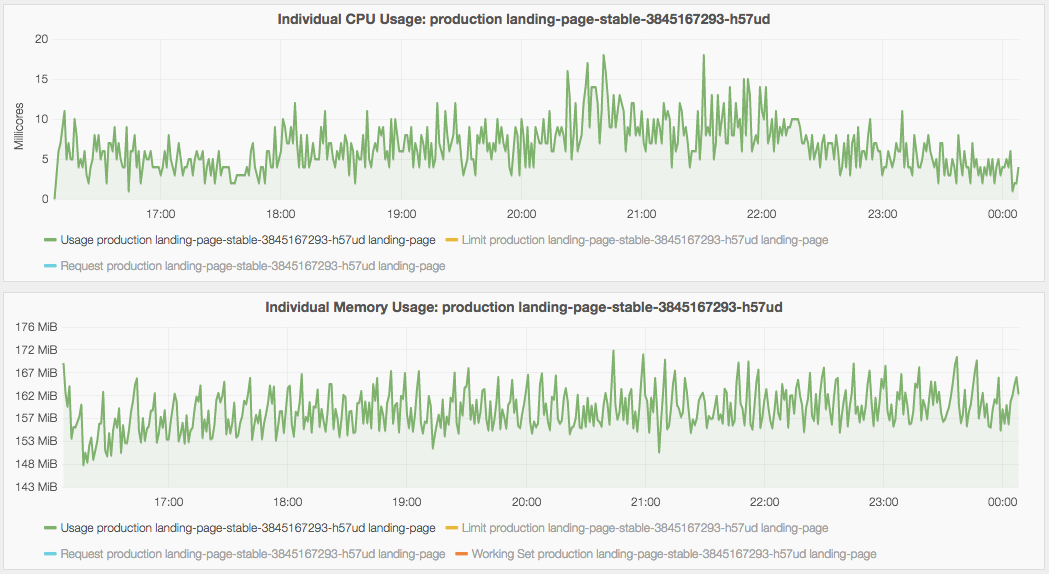
Observing how your services behave under load and how much compute they need is essential.
Also take some time to understand how QoS classes work in Kubernetes so you have a more fine control over which pods gets killed in the case of memory pressure. This is particularly important if you, like us, share the same cluster for all environments.
Tip: Enable Cross-Zone Load Balancing (AWS)
This is already fixed in Kubernetes 1.4, but for now, if you expose your services via the LoadBalancer type, don’t forget to manually enable cross-zone load balancing for the corresponding ELB; if you don’t, you might notice uneven balancing across your application pods if they are spread in nodes from different availability zones.
Tip: Give the kube-system Namespace Some Love
If you ever tried Kubernetes, you probably noticed there’s a kube-system
namespace there with a bunch of stuff in it; do yourself a favor and take some
time to understand the role of each of those things.
For instance, take the DNS add-on; it’s rather common to see people having issues because they forgot to add more DNS pods to handle their ever-increasing workload.
Going Live
Instead of shifting all traffic at once, like we did in staging, we thought we needed to take a more careful approach and used weighted routing policy to gradually shift traffic to the Kubernetes cluster.
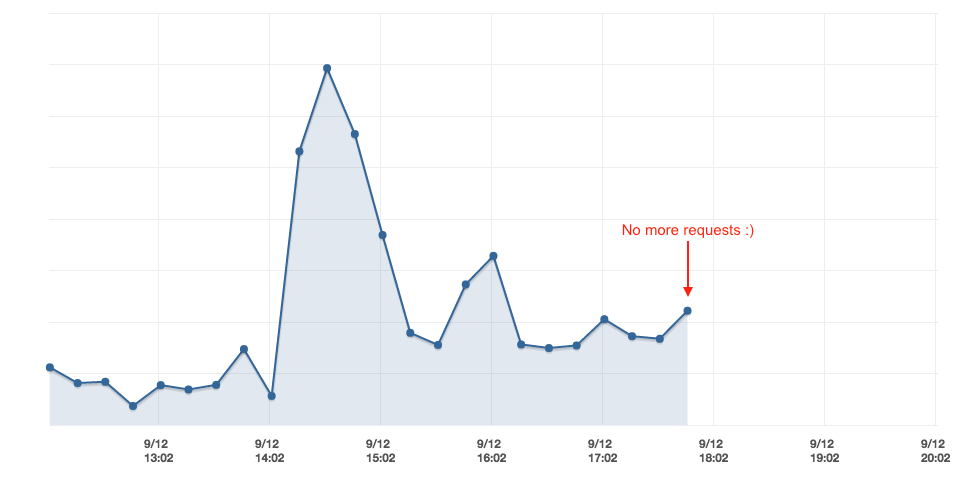
Once we noticed no more requests were reaching the legacy Beanstalk environments, we went ahead and killed them.
Update (Sep 21, 2016): All major services were migrated to our new platform! These are the final numbers:3
- ~53-63% decrease in monthly costs
- ~72-82% decrease in # of instances
Beyond Production
Kubernetes gave us the power to almost effortlessly mold our delivery pipeline in a way we never thought possible. One example of such improvement is what we call here development environments.
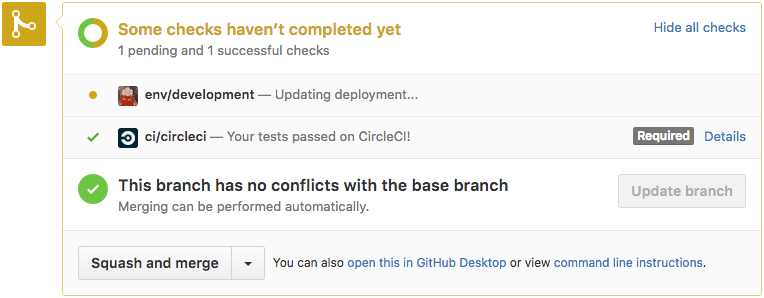
Whenever someone opens a Pull Request to one of our projects, the AWS Lambda function I mentioned earlier creates a temporary environment running the modifications introduced by the PR.
Also, whenever new code is pushed, this environment gets automatically updated as long as they pass the tests. Finally, when the PR is merged (or closed), the environment is deleted.
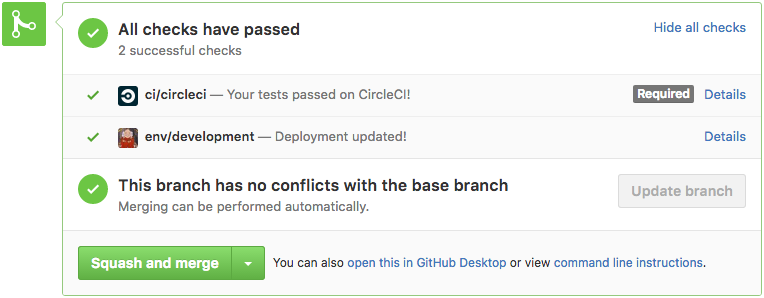
This feature made our code reviews more thorough because the developers can actually see the changes running. This is even more useful for UX changes in front-end services; artists and product owners get the chance to validate the changes and share their inputs before the PR is merged.
To send the GitHub Status notifications you see in these pictures,
we implemented a small daemon in Go that monitors deployments to our
development namespace and reconciles the deployment status for each revision.
Conclusion
Kubernetes is a very complex piece of software that aims to solve a very complex problem, so expect to spend some time learning how its many pieces fit together before using it in your projects.
Kubernetes is production-ready, but avoid the temptation of trying to run everything on it. In our experience, Kubernetes does not offer a clean solution for a number of problems you might face, such as stateful applications.
The documentation is not great as well, but initiatives like the Kubernetes Bootcamp and Kelsey Hightower’s Kubernetes The Hard Way gives me hope that this will no longer be a problem in the near future.
Without Kubernetes, I don’t know how - or if - we could have accomplished all the things we did in such a small period of time with such a small engineering team.4
We hope to continue building on Kubernetes to make our delivery platform even more dynamic and awesome!
-
Each AWS region seems to evolve at a different pace. At the time of this writing, multi-container Beanstalk applications and ECS were not available for the
sa-east-1region. Almost all of our users live in Brazil, so moving out to a different region wasn’t really an option. ↩︎ -
There are a number of initiatives to come up with a better tool to create and manage Kubernetes clusters, such as kops. ↩︎
-
Range depends on the workload. ↩︎
-
The ops/delivery team is actually a one-engineer team: me! ↩︎